 |
|
Prepare Orders Form Help
The EMR-Link Prepare Orders Encounter Form is used to extract User, Locations of Care and
Insurance information and write that data to tab-delimited files in preparation for
implementing EMR-Link (for electronic Orders) into your EMR. The form is invoked as part of
a patient encounter but it is not patient-centric. It reads the appropriate tables directly
to capture all Users, Locations, and Insurance data.
This form works with all released versions of Centricity EMR.

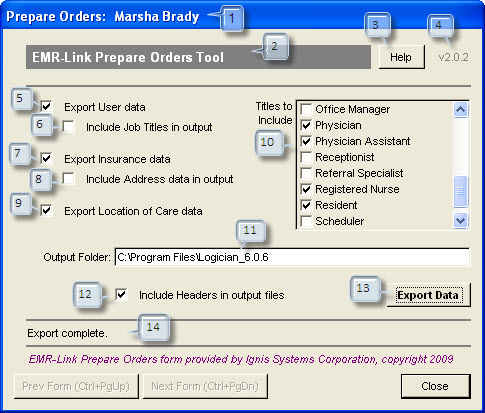
Shown below is a brief description of each element of the form referenced in the image.
- Form Title -- This title bar displays the Encounter Form name as well as the patient name. Though it is invoked through a patient encounter, the Prepare Orders Encounter form is not specific to a patient.
- Tool Banner -- This is the “EMR-Link Prepare Orders Tool” encounter form. It is used to gather all User, Insurance, and Location of Care information from the EMR.
- Help button -- Selecting the Help button brings up this help page. The help information is updated whenever new functionality is introduced or there is a change that affects the behavior or look of the form.
- Version number -- This number identifies the version of the Prepare Orders Tool that you have installed. It changes every time a new version of this form is released. New versions of the form are always backwards compatible with all previous releases so customers can download a new form at any time and know that it will work with your current system.
-
Export User data -- Keep this box checked if you want to export EMR user
data. The User export will create a tab-delimited file named ProviderList.txt containing
a row of data for each user configured in the EMR. The output file contains the columns
that match up with what is needed to import Provider data into EMR-Link.
LastName FirstName UPIN NPI LoginName OtherID AuthProvider AuthForOrders
Winston MD Harry hwinston
You can restrict which users are included in the export using the "Titles to Include" list box described below. - Include Job Titles in output -- Check this box if you want to add a column to the output file that contains the Job Title for each user exported.
-
Export Insurance data -- Keep this box checked if you want to export
insurance data. The Insurance export will create a tab-delimited file named InsuranceList.txt
containing a row of data for each Insurance Company configured in the EMR. The output file
contains the columns shown below though only the InsName and InsNameAbbr columns will be
populated since only those fields can be pulled from the EMR database.
InsName InsNameAbbrev LabInsCode Contracted ABNRequired DefaultBillType
Consolidated Heath Care CHC - Include Address data in output -- Check this box if you want to add columns to the output file that contain Address, City, State and Zip information for each Insurance company exported.
-
Export Location of Care data -- Keep this box checked if you want to export
Location of Care data. The LOC export will create a tab-delimited file named LocationList.txt
containing a row of data for each Location of Care configured in the EMR. The output file
contains the columns shown below though only the LOCName and LOCAbbr columns will be
populated since only those fields can be pulled from the EMR database.
LOCName DefLabForTests DefLabForSvcs LOCAbbr
Southside Clinic SOUTH - Titles to Include -- The Titles listbox can be used to filter the user export based on job titles. This list box is created based on the job titles configured in your EMR. Users that have unchecked titles in this list will not be included in the export.
-
Output Folder -- The Output Folder specifies the location where the
exported tab-delimited files will be written. This defaults to your EMR root folder but
can be edited to another folder prior to running the export.
Note 1: MEL does not have a mechanism for creating folders so you need to ensure that the folder path specified here actually exists before running the tool. If the form cannot find the specified path, you'll get an error.
Note 1: Use only forward slashes '/' when entering pathnames in EMR v5.6. A MEL script bug causes the path to not be read correctly if you use a backward slash. Either type of slash works correctly in later EMR releases. - Include Headers in output files -- Check this box if you want the output file to include a header row that defines each column in the file. This is useful if you want to import the data into an Excel worksheet. Headers should be disabled if you intend to upload the output files directly into EMR-Link.
- Export Data -- Clicking this button initiates the export action based on the current form settings.
- Status line -- This area of the form will display progress and status information when the "Export Data" button is selected.


